Earlier, we have talked about how to build a RAC database 19c on Linux platform already. This time, we turn to Windows platform, more specificially, it's Windows Server 2016. Is it simpler or not? You may take a look.
In this section, we are preparing two database servers for buidling a RAC database.
Network
Every server should prepare two network interface controllers (NIC), the first NIC is for public, virtual and SCAN IP, the second NIC is for private IP to do heartbeat.
Then we configured the following IP-Hostname mapping in C:\Windows\System32\drivers\etc\hosts on two nodes.
...

# Public

192.168.1.11 primary01 primary01.example.com

192.168.1.12 primary02 primary02.example.com


# Private

192.168.24.11 primary01-priv primary01-priv.example.com

192.168.24.12 primary02-priv primary02-priv.example.com


# VIP

192.168.1.111 primary01-vip primary01-vip.example.com

192.168.1.112 primary02-vip primary02-vip.example.com


# SCAN

192.168.1.81 primary-cluster-scan primary-cluster-scan.example.com

192.168.1.82 primary-cluster-scan primary-cluster-scan.example.com

192.168.1.83 primary-cluster-scan primary-cluster-scan.example.com
After setting, don't forget to test their connectivity by using ping.
Security
On both nodes, we opened a command prompt running as administrator and turned off Windows firewall completely.
Time
Time synchronization can be configured in Windows Time Service (W32Time) for RAC database.
OS Requirements
Only Windows Server 2012 R2 x64 or later is acceptable.
Software
The software packages we need to build a RAC database are home 19c and DB home 19c. Let's see how we unzip them on node 1.
1. Grid Home
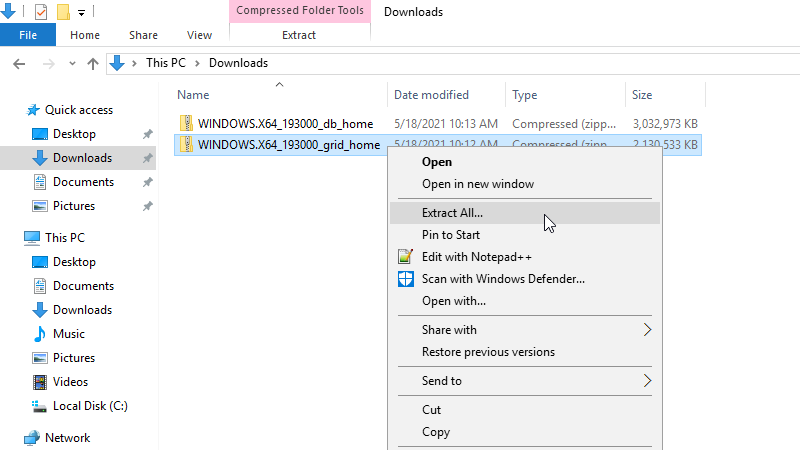
The grid home package we downloaded is WINDOWS.X64_193000_grid_home.zip. Next, we unzipped the package by the procedure.
Right click on the package and click "Extract All"
Enter Grid Home Path in the Field
The grid home we entered is c:\app\19.3.0\grid, you don't have to create the directory in advance.

Then click on "Extract".
2. DB Home
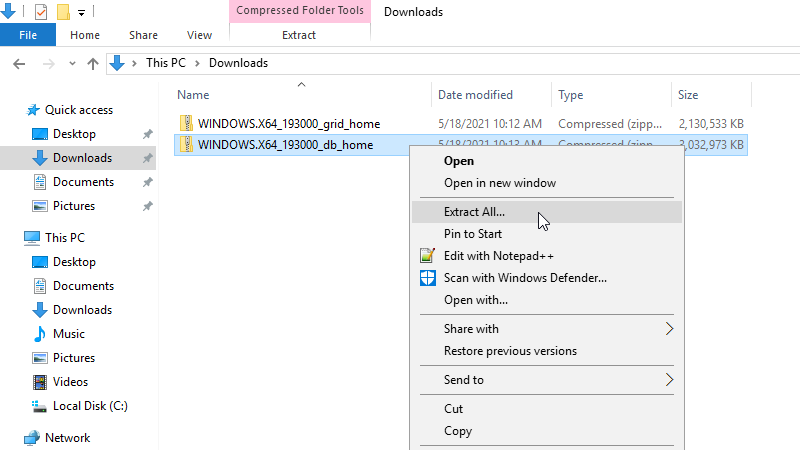
The DB home package we downloaded is WINDOWS.X64_193000_db_home.zip. Next, we unzipped the package by the procedure.
Right click on the package and click "Extract All"
Enter DB Home Path in the Field
The DB home we entered is C:\app\oracle\product\19.3.0\dbhome_1, you don't have to create the directory in advance.
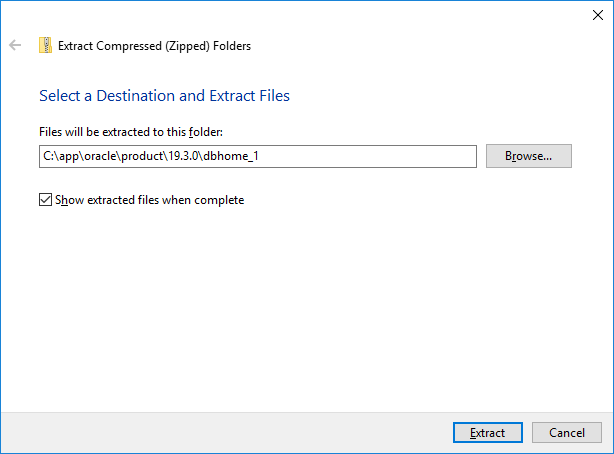
Then click on "Extract".
Storage
We need a shared storage for all nodes in the same cluster. Here we add a share disk for both RAC database servers, which is raw, unused one.
We use diskpart and asmtool to prepare the shared disk by the following steps.
1. Shutdown Node 2
We only need one server to operate on the shared disk. Here we choose to operate it on node 1.
2. Diskpart Shared Disk
Enter diskpart Interactive Mode
C:\Users\Administrator>diskpart


Microsoft DiskPart version 10.0.14393.0


Copyright (C) 1999-2013 Microsoft Corporation.

On computer: PRIMARY01


DISKPART> list disk


  Disk ###  Status         Size     Free     Dyn  Gpt

  --------  -------------  -------  -------  ---  ---

  Disk 0    Online          240 GB      0 B

  Disk 1    Offline         240 GB   240 GB
Select the Disk
DISKPART> select disk 1


Disk 1 is now the selected disk.


DISKPART> attr disk

Current Read-only State : Yes

Read-only  : Yes

Boot Disk  : No

Pagefile Disk  : No

Hibernation File Disk  : No

Crashdump Disk  : No

Clustered Disk  : No
Remove Readonly from the Disk
DISKPART> attr disk clear readonly


Disk attributes cleared successfully.


DISKPART> attr disk

Current Read-only State : No

Read-only  : No

Boot Disk  : No

Pagefile Disk  : No

Hibernation File Disk  : No

Crashdump Disk  : No

Clustered Disk  : No
Partition the Disk
DISKPART> create part ext


DiskPart succeeded in creating the specified partition.


DISKPART> create part log


DiskPart succeeded in creating the specified partition.
Online the Disk
DISKPART> online disk


DiskPart successfully onlined the selected disk.


DISKPART> list disk


  Disk ###  Status         Size     Free     Dyn  Gpt

  --------  -------------  -------  -------  ---  ---

  Disk 0    Online          240 GB      0 B

* Disk 1    Online          240 GB  1024 KB
List Partitions of the Disk
DISKPART> list part


  Partition ###  Type              Size     Offset

  -------------  ----------------  -------  -------

  Partition 0    Extended           239 GB  1024 KB

* Partition 1    Logical            239 GB  2048 KB
List and Select Volume
DISKPART> list vol


  Volume ###  Ltr  Label        Fs     Type        Size     Status     Info

  ----------  ---  -----------  -----  ----------  -------  ---------  --------

  Volume 0     D                       DVD-ROM         0 B  No Media

  Volume 1         System Rese  NTFS   Partition    500 MB  Healthy    System

  Volume 2     C                NTFS   Partition    239 GB  Healthy    Boot

  Volume 3     E                RAW    Partition    239 GB  Healthy


DISKPART> select vol 3


Volume 3 is the selected volume.
Unassigned the Drive Letter
DISKPART> remove


DiskPart successfully removed the drive letter or mount point.


DISKPART> list vol


  Volume ###  Ltr  Label        Fs     Type        Size     Status     Info

  ----------  ---  -----------  -----  ----------  -------  ---------  --------

  Volume 0     D                       DVD-ROM         0 B  No Media

  Volume 1         System Rese  NTFS   Partition    500 MB  Healthy    System

  Volume 2     C                NTFS   Partition    239 GB  Healthy    Boot

* Volume 3                      RAW    Partition    239 GB  Healthy


DISKPART> exit
3. Make ASM Disk
Since we have unzipped the grid home package, so we have tools to create a ASM disk. Here we use asmtool, a command-line interface for operating ASM disks.
List ASM Disks
C:\Users\Administrator>cd C:\app\19.3.0\grid\bin


C:\app\19.3.0\grid\bin>asmtool -list

NTFS                             \Device\Harddisk0\Partition1              500M

NTFS                             \Device\Harddisk0\Partition2           245258M

                                 \Device\Harddisk1\Partition1           245757M
The unformatted disk is the one we want to use.
Create an ASM Disk
C:\app\19.3.0\grid\bin>asmtool -add \Device\HardDisk1\Partition1 ASM01


C:\app\19.3.0\grid\bin>asmtool -list

NTFS                             \Device\Harddisk0\Partition1              500M

NTFS                             \Device\Harddisk0\Partition2           245258M

ORCLDISKASM01                    \Device\Harddisk1\Partition1           245757M
Where ASM01 is the customized disk name.
4. Shutdown Node 1
To write some remainder information into disk, it's safer to shut down the first server for further operations.
5. Startup Node 2
Since the shared disk has been partitioned and created for an ASM disk on node 1, so we don't need to partition it on node 2, but we still have to remove readonly attribute from the disk and so on.
Enter diskpart Interactive Mode
C:\Users\Administrator>diskpart


Microsoft DiskPart version 10.0.14393.0


Copyright (C) 1999-2013 Microsoft Corporation.

On computer: PRIMARY01


DISKPART> list disk


  Disk ###  Status         Size     Free     Dyn  Gpt

  --------  -------------  -------  -------  ---  ---

  Disk 0    Online          240 GB      0 B

  Disk 1    Offline         240 GB   240 GB
Select the Disk
DISKPART> select disk 1


Disk 1 is now the selected disk.


DISKPART> attr disk

Current Read-only State : Yes

Read-only  : Yes

Boot Disk  : No

Pagefile Disk  : No

Hibernation File Disk  : No

Crashdump Disk  : No

Clustered Disk  : No
Remove Readonly from the Disk
DISKPART> attr disk clear readonly


Disk attributes cleared successfully.


DISKPART> attr disk

Current Read-only State : No

Read-only  : No

Boot Disk  : No

Pagefile Disk  : No

Hibernation File Disk  : No

Crashdump Disk  : No

Clustered Disk  : No
Online the Disk
DISKPART> online disk


DiskPart successfully onlined the selected disk.


DISKPART> list disk


  Disk ###  Status         Size     Free     Dyn  Gpt

  --------  -------------  -------  -------  ---  ---

  Disk 0    Online          240 GB      0 B

* Disk 1    Online          240 GB  1024 KB
List Partitions of the Disk
DISKPART> list part


  Partition ###  Type              Size     Offset

  -------------  ----------------  -------  -------

  Partition 0    Extended           239 GB  1024 KB

* Partition 1    Logical            239 GB  2048 KB
List and Select Volume
DISKPART> list vol


  Volume ###  Ltr  Label        Fs     Type        Size     Status     Info

  ----------  ---  -----------  -----  ----------  -------  ---------  --------

  Volume 0     D                       DVD-ROM         0 B  No Media

  Volume 1         System Rese  NTFS   Partition    500 MB  Healthy    System

  Volume 2     C                NTFS   Partition    239 GB  Healthy    Boot

  Volume 3     E                RAW    Partition    239 GB  Healthy


DISKPART> select vol 3


Volume 3 is the selected volume.
Unassigned the Drive Letter
DISKPART> remove


DiskPart successfully removed the drive letter or mount point.


DISKPART> list vol


  Volume ###  Ltr  Label        Fs     Type        Size     Status     Info

  ----------  ---  -----------  -----  ----------  -------  ---------  --------

  Volume 0     D                       DVD-ROM         0 B  No Media

  Volume 1         System Rese  NTFS   Partition    500 MB  Healthy    System

  Volume 2     C                NTFS   Partition    239 GB  Healthy    Boot

* Volume 3                      RAW    Partition    239 GB  Healthy


DISKPART> exit
6. Startup Node 1
We make both servers online.
So far we have already prepared two servers for the RAC database. Next, let's see how to install grid infrastructure 19c on Windows.
Hi,
Just a clarification, how the shared disk was implemented, as it appears as a physical disk in diskpart.
I understand that whether nodes are virtual or physical machines, they need to have a read/write shared disk.
Was it an iSCSI, NFS, SAN configured share?
BR
In this case, we use iSCSI.